
Starter Projects
In the Start Page for Designer, there are starter projects available. These serve as an example of different project configurations.
Commercial Project
The commercial project is an example setup for a commercial facility. This project includes systems for access control, intercoms, lighting, temperature control, and cameras. We will walk through each area of the project below.
Display Layout

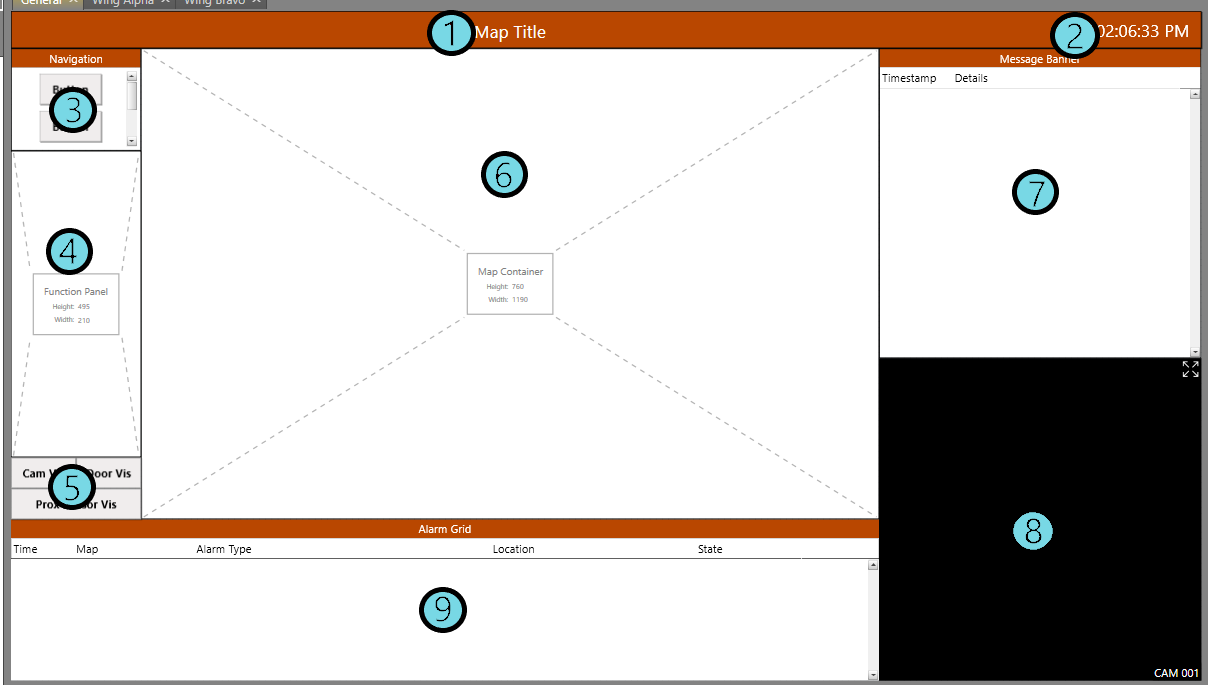
| 1. Map Title | Displays the title of the Map shown in the Map Container. |
| 2. Date/Time Display | Displays the current system time. |
| 3. Navigation Item | Displays buttons used to navigate between Maps. This is currently configured to display buttons for all three Maps. To view this configuration, double-click the Navigation Item. |
| 4. Function Panel | Displays asset commands and operations from Interactive Workflows. |
| 5. Map Container | Displays the Maps. The Map displayed on startup is configured by selecting the item, then clicking the ellipsis (...) button in the Properties grid. |
| 6. Message Banner | Prints messages. These messages are sent from Workflows. |
| 7. Video Viewer | Displays video feeds from cameras. Camera feeds are displayed in Runtime by selecting the camera, then the video viewer. |
| 8. Alarm Grid | Displays asset alarms. These are configured by assigning an asset status to be alarmed, allowing important events (such as a fire alarm) to be brought to the Runtime operator's attention. |
Maps
Building Systems
- HVAC
- Temp Sensors
- Humidity Sensors
This type of layout is used for dashboards where we do not need to see a representation of the physical layout for where these are located, but rather just need to be able to quickly view information about these systems.
Lobby
The Lobby Map contains a background image with the layout of a physical area, with assets placed to represent physical devices. We have a setup with a fire detector, a camera, controlled doors and emergency lighting. This setup can be used to facilitate an evacuation of the area in the event of a fire.
Perimeter
The Perimeter Map contains a background showing the area surrounding the facility. Contained is a gate with an intercom and cameras. Within the building is a master station for the intercoms. This setup can facilitate controlled entry/exit from the facility grounds.
Interactive Workflows
Fire Alarm
This Workflow triggers when we select a fire detector. If there is an active fire alarm, it will bring up a camera feed of the area in the Video Viewer. The Runtime operator is then prompted whether an evacuation needs to be initiated, or if security should be sent to investigate. If we initiate the evacuation, doors are opened and emergency lights are turned on. If we choose to send security, a notification is sent to security staff instead to investigate.
Intercom Gate
This Workflow walks an operator through the approval process to allow a driver through the gates to enter the facility grounds. When the driver initiates a call on the intercom, the camera to the gate is called up into the Video Viewer. The operator will then validate their identity, whether the visit was scheduled, and if their contact is available. They can then allow the driver through. The event is logged in an audit trail.
Background Workflows
Jump to Alarm
This Workflow will trigger when we get an asset status change. If the user does not already have an asset selected in Runtime, the asset with the highest priority alarm will be navigated to and selected automatically. This assists in bringing important events to their attention.
Kantech Pass
This Workflow triggers on a door asset changing its status. If the associated status is Unsecure+REX Disabled, the Workflow unlocks the door, then locks it again after 15 seconds.
Temp Sensors
The Temp Sensors Workflow triggers when one of our temperature sensors changes status. If it is too cold, the heat will be turned on, and if it is too warm, the air conditioning will be turned on. Once the sensor detects a desirable temperature, no heat or air conditioning will be used.
Lab Project
The Lab project is an example of the setup for a laboratory facility. This project includes systems for location tracking, access control, cameras, and proximity sensors. We will walk through each area of the project below.
Display Layout
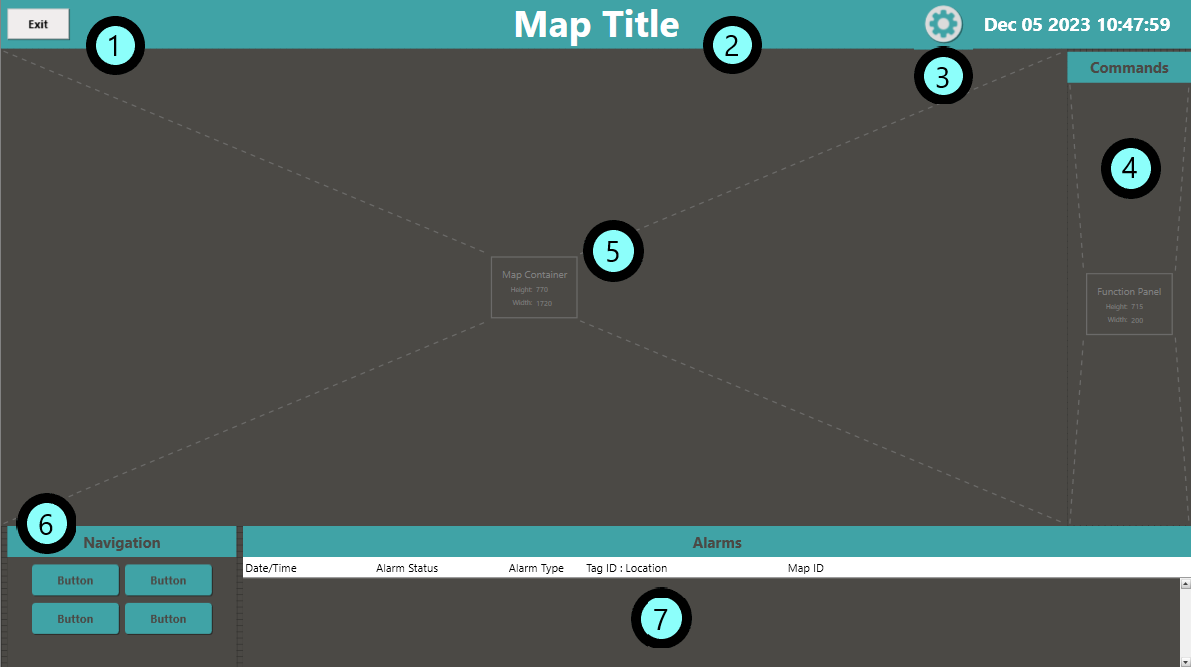
| 1. Map Title | Displays the title of the Map displayed in the Map Container. |
| 2. Date/Time Display | Displays the current system time. |
| 3. Navigation Item | Displays buttons used to navigate between Maps. This is currently configured to display buttons for both Maps. To view this configuration, double-click the item. |
| 4. Function Panel | Displays asset commands and operations from Interactive Workflows. |
| 5. Visibility Buttons | These buttons toggle the visibility of different assets. The Cam Vis for cameras, Door Vis for doors, and Prox Sensor Vis for proximity sensors. This allows the user to control what all is being displayed on a Map. |
| 6. Map Container | Displays our Maps. The Map displayed on startup is configured by selecting the item, then clicking the ellipsis (...) button in the Properties grid. |
| 7. Message Banner | Prints messages. These messages are sent from Workflows. |
| 8. Video Viewer | Displays video feeds from cameras. Camera feeds are displayed in Runtime by selecting the camera, then the video viewer. |
| 9. Alarm Grid | Displays asset alarms. These are configured by assigning an asset status to be alarmed, allowing important events (such as a staff duress alarm) to be brought to the Runtime operator's attention. |
Maps
Wing Alpha
This Map contains a floor plan layout where we have zones for RTLS (Real-Time Location System) tracking, doors, cameras, proximity sensors and fume hoods. This allows for access control, location tracking, and control over the fume hoods. We can view cameras for the office, lab, and storage areas.
Wing Bravo
The Wing Bravo Map contains a floor plan with less tracking and access control than Wing Alpha. This is an area with less restriction for the areas. However we do still have RTLS zones for location tracking, door access control, and cameras for the area.
Interactive Workflows
Access Denied
This Workflow triggers when a user is denied access to pass through a door. The event is logged and a camera for the door is pulled up in the Video Viewer. The Runtime operator can choose to allow them through or to alert security personnel.
Access Granted
This Workflow triggers when user has been granted access to pass through a door. The event is logged and the door is unlocked for them.
Background Workflows
Access Denied - Lockdown
This Workflow triggers when access through a door has been denied. If the area is currently restricted, the door will be locked. Otherwise the door will be unlocked and they will be allowed to pass through.
Access Granted - Lockdown
This Workflow triggers when access through a door has been granted. If the area is currently restricted, the door will be locked. Otherwise the door will be unlocked and they will be allowed to pass through.
Pass
This Workflow triggers on a door asset changing its status. If the associated status is Unsecure+REX Disabled, the Workflow unlocks the door, then locks it again after 5 seconds.
Restricted Lockdown
This Workflow triggers when a lockdown is initiated for a restricted area. It logs the event and locks the doors.
Restricted Normal
This Workflow triggers when a lockdown for a restricted area is over. It logs the event and unlocks the doors.
Unrestricted Lockdown
This Workflow triggers when a lockdown is initiated for an unrestricted area. It logs the event and locks the doors.
Unrestricted Normal
This Workflow triggers when a lockdown is lifted for an unrestricted area. It logs the event and unlocks the doors.
Untagged Human
When a proximity sensor detects movement, this Workflow checks whether there is someone with an RTLS tag in that area. If not, the camera for that area is displayed, security is notified and the status of the zone is changed to show the Runtime operator that there is someone without an RTLS tag in that area. This assists in preventing someone with unauthorized access from wandering around the facility.
Volatile Chem
When there is a volatile chemical in one of the lab areas, this unlocks the doors and allows staff to exit the area. A temporary lockdown is initiated while
RTLS Project
The RTLS project serves moreso as a template for the setup and configuration of an RTLS system, as it does not contain maps or assets for most of the systems. This project is only available for authorized users. For inquiries about authorization, please contact support.
Display Layout
| 1. Exit Button | Clicking this button triggers the Exit Runtime workflow, which closes Runtime. |
| 1. Map Title | This item displays the configured title for the map being displayed in the map container. |
| 3. Tag Test Button | Clicking this button opens up the tag testing page for the Actall integrated system. |
| 4. Function Panel | This displays the command buttons when assets are selected, as well as visual elements for interactive workflows. |
| 5. Map Container | This displays maps. |
| 6. Navigation Item | This displays buttons used to navigate between maps and swap which one is being displayed in the map container. |
| 7. Alarm Grid | This displays asset alarm information. |
Background Workflows
Exit Runtime
Kills the processes for Runtime.
Toggle Tag Testing
When the tag testing button is clicked, this makes the web browser item visible. If it is clicked again, it will return the web browser to being invisible. The web browser item loads up the tag testing page for the Actall system.