
Configure an ExacqVision Monitor
The ExacqVision integrated system can be configured to send camera asset feeds to an ExacqVision monitor. It is recommended to use either Video Viewers on a Display Layout or VideoFusion to display camera feeds for simpler configuration, however the option to use an ExacqVision monitor is supported.
Configure ExacqVision Client to Display Video
Before video can be sent from a camera asset to the ExacqVision monitor, the client must be configured to allow video display.
To configure the ExacqVision Client to Display Video:
-
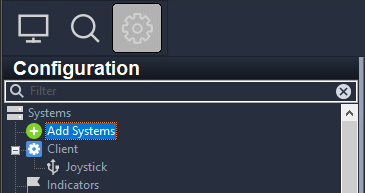
In the ExacqVision Client, select the gear icon to open settings.

-
From the navigation, click Add Systems and add your ExacqVision server. Check
the Enabled checkbox.
Configure ExacqVision Monitor in Designer
To display the camera asset in an ExacqVision monitor, the project must be configured to send camera feeds to it.
To configure an ExacqVision monitor in your project:
- In Designer, go to , right-click Tyco ExacqVision and select Configure.
- Navigate to Monitor Configuration.
- Set the Identifier to your configured Display Name, e.g.,COMPUTER20.
- Set the Layout for the configured monitor instances (e.g., for 4, select 2x2).
- Ensure the Monitor Type is set to Native.